Home » Posts filed under buns/pao/dumplings
Tampilkan postingan dengan label buns/pao/dumplings. Tampilkan semua postingan

Panda Baozi ????


At first i was planning to make panda cartoon character bread buns, but last minutes decided to change it to baozi as baozi look closer to real panda which has two colours, white and black.


 Nowadays i try to avoid using shortening in baozi dough. I just use vegetable oil like corn oil and also replace water with fresh milk (inspired from bread that using milk) as to make it soft.


updated on 25 Aug 2015- This panda baozi turned out quite dry the next day (due to no shortening was added), so try to consume within the same day or steam it again .

Panda Baozi ????
*makes 8 baozi

For the baozi
300g low protein flour or cake flour (I use Japanese cake flour)
1tsp instant yeast
40g caster sugar
1/4tsp salt
20g corn oil
170g fresh milk


1tsp Japanese charcoal powder
240g red bean paste (I use homemade), weight 30g each and roll into ball

Method
1. Add all baozi ingredients in a mixing bowl and combine well. Knead till dough become smooth and no sticky to hands.
2. Remove 70g plain dough and add charcoal powder, knead till smooth. Cover both dough with damp cloth and rest for 60mins.
3. Transfer plain dough to a lightly floured surface and knead for a while, divide into 8 portions and shape into ball.
4. Flatten and roll out the dough into a circle. Place red bean ball onto the center, wrap and pleat up the sides and seal.
8. Place the baozi (pleat area face down) onto a piece of greaseproof paper.
9. Roll charcoal dough into thin sheet, use a round 3cm cutter , cut two circle dish. Then cut each circle into half, stick them on the plain dough as eyes and ears. Pinch a small dough, place at the centre as for nose (you can brush water if it can�t stick). Place them on the steaming pan. Cover with a piece of damp cloth and let rise for another 10mins.
9. Steam the baozi under rapidly boiling water on high heat for 15mins.
10. Remove from steamer and serve, serve warm.


Recipe by Sonia a.k.a Nasi Lemak Lover


This post is linked to the Best Recipes for Everyone August 2015 Event (Theme: Dim Sum) organised by Fion (XuanHom's Mum Kitchen Diary) and hosted by May (????)

Pumpkin Bao with Chicken and Onions ???????

This morning just realized that today is deadline to submit pumpkin baozi (steamed buns) to "Best recipe for everyone" event. So i decided to make pumpkin bao with chicken and onion filling so can be served as lunch.


This time just changed my earlier Chicken and Onion Bao recipe to Pumpkin Bao, still using my favourite chicken and onion filling.


Pumpkin Bao with Chicken and Onions filling (steamed buns) ???????
*makes 8

For chicken and onions filling
250g debone chicken thigh (cut small bite size pieces)
1 spring onion, sliced
100g yellow onion, wedged

1tsp light soy sauce
1/2tsp salt or to taste
1/2tsp sugar or to taste
1tsp sesame oil
1tsp dark caramel soy sauce or you may replace with dark soy sauce
A dash of white pepper
Water, add when it is necessary

Method

  1. Heat oil in a wok, saut� spring onion till aroma.
  2. Add in chicken pieces and onion, stir to till mix well.
  3. Add in seasonings, continue to cook till chicken tendered over medium heat, add water when it is necessary ( I did not add water at all).
  4. Dish out and set aside to cool
 

2 hard-boiled eggs, wedged

For the Pumpkin bao dough

250g all purpose flour or plain flour
1/4tsp salt
1tsp instant yeast
40g caster sugar
40g corn oil
80g mashed pumpkin ( I use overnight mashed pumpkin that kept in the fridge)
60g fresh milk or adjust accordingly

  Method
 1. Mix all ingredients in a mixing bowl, mix well and knead till smooth and no sticky to hands.
 2. Cover with damp cloth and proof to double in size (30-60mins).
 3. Knock down dough to expel some air, transfer to a lightly floured surface and knead for a while.
 4. Equal divide into 8 portion, roughly shape into a ball, rest for 15mins.
 5. Flatten and roll out the dough into a circle with a rolling pin. Spoon in chicken filling and hard-boiled egg onto the center and pleat up the sides and seal.
 6. Place the bau onto a piece of greaseproof paper, on the rack for steaming. Cover with a piece of damp cloth and let rise for another 15 mins.
 7. Steam the bau under rapidly boiling water on high heat for about 10 to 12 mins.
 8. Remove from steamer and serve hot.
 9. Store in the fridge for left over bao, steam again before serve.


Recipe by Sonia a.k.a Nasi Lemak Lover

I'm submitting this post to the Best Recipes for Everyone
 July 2015 Event : I have a date with "Pumpkin"
organized by Fion of XuanHom's Mom and co-hosted by  Rachel

Sweet Corn Mantou (steamed buns) ?????

My daughter requested some plain mantou (steamed buns) as she prefer raw and plain steamed buns rather than with filling like normal baozi. Anyway, i didn't make the very raw mantau without any flavours, instead i added some sweet corn cream into it as inspired from a similar sweet corn baozi that i tasted earlier.


Making mantou is easy as you don't need to proof for too long..

recently i used the Bonuslink points to redeem this two tier steamer, i can steam all mantou at one go ^_^

Raw and plain mantou, just eating like that also good, with a cup of coffee, perfect!


I feel the corn taste is not strong enough, if you like to try this recipe, you can increase sweet corn cream a bit and reduce milk at the same time.

Sweet Corn Mantou (steamed buns) ?????
*makes around 16 buns

500g plain flour or all purpose flour
1 and 1/2tsp instant yeast
50g caster sugar
1/4tsp fine salt
25g corn oil
170g fresh milk
150g sweet corn cream style ???( I use Ayam brand)


Method
1.      Blend sweet corn cream style with milk. Then mix it with the rest of the ingredients in a mixing bowl, combine and knead till smooth dough. Set aside to rest for 5mins.
2.      Divide the dough into two portions. Use a rolling pin, roll out the dough into rectangular shape. Then roll up the dough like a swiss roll, slightly roll on countertop to tighten it.
3.      Cut in small piece (7-8 pcs per dough) and put on the wax paper. Place them in the steamer and proof for 15mins.
4.      Steam on medium fire for 15mins (from the time water started to boil)


Recipe by Sonia a.k.a Nasi Lemak Lover

Pumpkin Rose Buns ???????

At first I was planning to make normal mantou or steamed buns with pumpkin. While the dough was resting, suddenly I think of the rose shape of buns that I have been wanting to try out. This dough is easy to handle and I am glad that these rose buns turned out so good that it gone finished at the same day ^_^.


Lets see how to shape rose buns


Natural colour, no burden at all to enjoy these buns as many as you want.  I also try to reduce the amount of yeast used, too much of yeast is not good for digestion.


Pumpkin Rose Buns ???????
*makes 10 buns 

90g mashed pumpkin
25g fresh milk

1/2tsp instant yeast
200g plain flour
35g sugar (reduce to 25g if you prefer less sweet)
20g corn oil 

Method

  1. Add all ingredients in a mixing bowl then combine well and knead till smooth. Set aside to rest for 15mins.
  2. Weight the dough into 15g each and roll into ball. Roll out 5 pieces into round thin shape, and roll a small piece of dough like a small log (two ends smaller).
  3. Layer the rolled out pieces of dough so that they overlap each other. Place a chopstick in the middle and press down lightly over the layered circles of dough, to secure in place. Put the log-shaped piece of dough at the end of circle of dough.
  4. Roll up the pieces by holding at the middle of dough, then halve the dough using a knife.
  5. Place the wrapped dough cut side down on a paper. Repeat for the rest of the dough.
  6. Put the rose shaped buns in a steamer, and leave to rise for 20mins.
  7. Bring water to a boil in a steamer. Steam the rose buns over high heat for 15 minutes.

 Recipe by Sonia a.k.a Nasi Lemak Lover
This post is linked to the event Little Thumbs Up (Oct 2014 Event: PUMPKIN) organised by Zoe (Bake for Happy Kids) and Mui Mui (My Little Favourite DIY) and hosted by Eileen (Eileen's Diary)


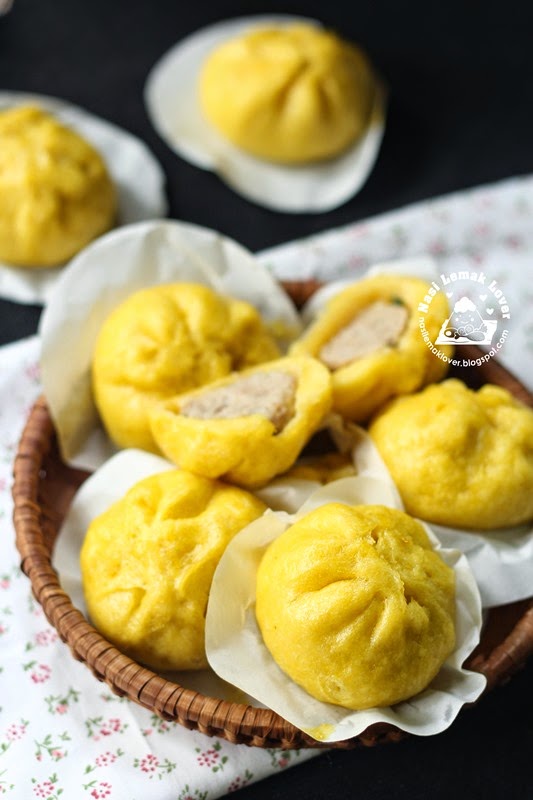
Steamed Pumpkin Meat Bao ??????

?
This month is good time to enjoy fresh and cheap pumpkin. At first I was thinking to make these bao into pan fry type. Anyway, last minutes changed to steamed type, as I am lazy to clean the mess after pan fried.


Before steaming..?


If next time I will make this bao again, I will increase the dough weight (50g) as we found the skin is a bit thin (suitable for pan dry actually). We also tasted a hint of sourness, I am not sure where is the source of sourness came from. If you plan to try this recipe, let me know if you have the same problem.
Updated on 4th Oct- as per feedback, the sourness might caused by over proof the dough, thus I have changed the proofing time to 30mins.

Steamed Pumpkin Meat Bao ??????
*makes 9 buns 

For the Bao
150g cake flour
100g mashed pumpkin
3/4tsp instant yeast
1/4tsp salt
30g caster sugar
30g corn oil
1/2tbsp water or adjust accordingly depend on the water content of mashed pumpkin

For the meat filling
200g minced pork
� onion, chopped
1 spring onion, chopped
1tsp sugar
3/4tsp salt
1tsp light soy sauce
1/2tsp sesame oil
1/2tp rice wine
1tsp corn flour or tapioca flour
2tsp water 

Method

  1. Mix all bao ingredients in a mixing bowl, combine well and knead till smooth dough.Cover with damp cloth and rest for 30mins.
  2. Mix all meat filling ingredients till sticky paste, keep in the fridge before use.
  3. Knock down dough to expel some air, transfer to a lightly floured surface and knead for a while.
  4. Equal divide the dough into 9 portions (~35g), roughly shape into a ball and rest for 10mins.
  5. Equal divide the meat filling into 9 portions (~30g).
  6. Fatten and roll out the dough into a circle. Place meat filling onto the center, wrap and pleat up the sides and seal.
  7. Place the pumpkin buns (pleat area face down) onto a piece of greaseproof paper, on the rack for steaming. Cover with a piece of damp cloth and let rise for another 10-15 mins.
  8. Steam the buns under rapidly boiling water on high heat for about 20-25mins.

Recipe by Sonia aka Nasi Lemak Lover


This post is linked to the event Little Thumbs Up (Oct 2014 Event: PUMPKIN) organised by Zoe (Bake for Happy Kids) and Mui Mui (My Little Favourite DIY) and hosted by Eileen (Eileen's Diary).